Showing posts with label Inspiration and Ideas. Show all posts

Thursday, December 1, 2011

Recycled T-shirts party


This post was 2 months in the making - she has been 11 for a while!

Being a child of the 70's and a sewist (there's a reason we don't call ourselves "sewers"), I have always loved recycling denim.  But these days the hottest recycled clothing trend has got to be recycling and up-cycling T-shirts. 
This year for Earthgirl's 11th birthday party, we jumped into the fun with a T-shirt recycling party.  She grabbed the idea from the September/October 2011 issue of American Girls magazine.  You can find recycled T-shirt ideas from all over the internet.  Take a look here and here,  for example.  I found bunches and bunches of ideas for the future - for example, I'd love to make one (or 15!) of these recycled T necklace/scarves.

Now if one is inviting 14 girls over, and 2 of your projects take a T-shirt apiece, you gotta have lots of Ts!  Our big crafts, requiring a T-shirt apiece per girl, were the fringed scarf and the big T-shirt bag. We invited the girls to bring Ts with them, but knew we wanted to provide plenty.

For several weeks ahead, Earthgirl and I hit a couple of local thrift stores, one which exists to support a local church's international missions; the other to support Hospice.  We like spending our $$ where they do some good works, too!   We snapped up Ts at an average price of about 40 cents.  We looked for colors we liked, designs we thought would look good on a bag, and the right sizes to make bags and scarves (bags can be any size, but a XXL makes a humongous bag, whereas a sturdy size small or child-size makes a nice bag, and our scarves worked best with child-sized, soft, lightweight Ts).

Recycled T-shirt Scarves:
For our scarves, the girls cut off the hem and cut across under the sleeves, leaving a wide tube of fabric.  They fringe-cut both sides, then pulled on the fringes to make them curl up. 

The best-looking scarves had really skinny fringe - but the trick is to cut it skinny enough, but not so skinny that it tears when you stretch it.  This red scarf had the prettiest fringing of all the scarves.

The result is a fringy cowl-type scarf.  If you use a T as big or bigger than your own size, the cowl can be doubled.  If you use a little preschooler-size T, you get a once-around-your-neck scarf.

And then, of course, you cannot resist playing with the leftovers.  Lots of braided headbands, bracelets, anklets appeared!


The scarves also double as hula skirts.


Recycled T-shirt Bags:
Our big T-bags were made simply - cut out the sleeves and along the neckline, leaving something that looks like a tank top.  Check to see that it fits over your shoulder.  Good.  Now, if you want a plain-bottom bag, turn the T inside out, and sew up the bottom.  The cutest bags were sewn with a curve.  If you want a fringe-bottom bag, cut off the T's hem, and sew up the bottom, leaving a 2-3" seam.  Trim the seam in to a fringe. Pull the fringes to make them curl, and you're done! 


In all the excitement, I did not snap 1 picture of any girl with a bag.  This one is taken weeks later.


Friday, July 8, 2011

Sew Helpful

Amended to add:  Cynthia's invisible zipper tutorial looks great - I think I will try this method next time.  Thanks to Jennifer from Sewplicity for recommending it!

Sew4Home has a great post:  You Asked For It  -  a long list of detailed sewing basics.  I'll look at their invisible zipper tutorial later this evening before I attempt my second-ever invisible zipper installation.  I have never thought of using an invisible zipper on a pillow, but what a cool idea.

And look at this post about sewing an invisible zipper with a facing from Colette Patterns!  How cool is that?  I plan to line my skirt, and may try to make this technique work to attach the lining, skirt, and zipper all in one scary step.

Here is the skirt I am working on:

Monday, April 11, 2011

More on the Wall

an update on my April 1 post

The scrapbook paper wall art, mounted on 12"x12" canvases (I trimmed the paper to about 11.5" square), with blue, green, and charcoal ink smeared around the edges

I need to put that pillow cover on the sewing list - it's still just folded on with 1 safety pin.

--and the girls have taken over the TP roll art!

Saturday, April 9, 2011

Here is some of that wall art I was talking about

Making TP roll art is addictive!  


I cut and glued this little piece together in about 15 minutes during the tornado warnings last week.


Spray paint with a little "Hammered" and clear coat, and we are ready to hang.

Pretty good little doodad, huh?

I picked this little metal and canvas piece at Hobby Lobby's 90%-off section. The frame was scratched up.  The sentiment was OK (not my fave...), but the green giraffe-skin background was probably the whole reason it never went home with anyone.


I used a brown acid-free marker to fix the metal frame, painted the canvas black, stencilled on my own sentiment, rubbed a little brown over it to age it, sprayed the canvas part with acrylic clear coat, and hung it up.

 -and you can see the faux metal doodad through the open door.

Friday, April 1, 2011

17 More Projects - Part 3: More wall art

Project ideas are really stacking up in my head.  It would be so much fun to take a week off, just stay home and do fun projects. 

I have an impressive stash of scrapbook paper, thanks to a store closure about 2 years ago. I'd prefer the store to have stayed in business : (  When it's time to make a card or do an album layout, I have the goods, and some of my prettiest papers I bought for pennies.  {At the same store closing I picked up 2 reams of nice-quality 11"x17" plain white paper for $3 total, and Earthgirl, her friends, and all the Sm'Arties have been drawing, coloring, painting, and writing on it for almost 2 years here, here, here. }

I've already done a couple of pieces of scrapbook paper art, hung in the multipurpose room (office, craft, school, home theater), but I want to add some to my bedroom.

The 2 papers in the multipurpose room, mounted on 12' vinyl tiles, Mod-podged.


Scrapbook paper auditioning for the roll of wall art.  Here are the 3 finalists.  The floral fabric is auditioning for the role of pillow cover.  I think it is a shoe-in. And imagine that headboard painted black and distressed...
Here are some places with cool ideas:

Frugal life Project's Wall Art - my original inspiration

Sew Can Do's wall art - another good use of pretty paper

Here's some more from sealed with a Kiss

and more from 31diy: easy peasy wall Art, using frames...

...which reminds me of my friend Science Geek's decor, and here .  She gave me 2 pieces for Christmas:


I love the sentiment on this one.  I love that she gave it to me. She's making the story of my life, too.


...and just when you think you've seen all the cool stuff your wall could take, I run across somethings like this pinwheel art.  ...which reminds me of this recycled magazine gift bow from How About Orange that I intend to make one day.  I've got plenty of magazines...

Tuesday, March 29, 2011

17 more projects, part 2

I'd like to have some curlicue doodads above a few of my pictures, but don't want to spend much money on it. Well, I don't want to spend ANY money.
Here is a picture hung in my dining room with a metal curlicue doodad over it.  (Were you wondering what the definition of "curlicue doodad" was?)  These little toppers help the look of a rectangular picture hung under a vaulted ceiling.  Like I said, I don't want to spend much on these, so I am looking at some ideas. 

I just found out that curlicue is spelled with a "c" rather than a "q" - curlique.  Thank you, Mr. Spelczek.
I picked up one little piece of metalwork from the 90%-off section at Hobby Lobby - my kinda price tag!  The catch is that an end is broken off.  I think I can recreate the end with a craft stick, Mod Podge papier mache and Rustoleum's hammered-look spray paint.

That will take care of one little picture.  But I want to take care of a BIG picture, so I am looking at some DIY inspiration - a real trash-to-treasures story:

Something like this project from Suzy's sitcom.  Pretty cool, huh?

Or How-To Gal's versionHer fabric wall art here is simple, and the variety is unlimited. I might have to make one of these, too.
OK, it turns out there are TP roll rescuers all over - I like those wreaths

But now THIS TP roll art is just outrageous! - and fascinating!  The tree is delicate and lovely, but the faces are a little creepy, though still fascinating.

Monday, March 21, 2011

17 More Projects

I have that whole 17 Projects vibe goin' on in my head again. I am wanting to do it myself!  Today I'll show you some home decor inspirations that are calling my name.  Maybe later this week I'll show you some more, including crochet and sewing.  Hey, maybe I'll even get crazy and post recipe inspirations!  Here is the today bunch:
 We painted Earthgirl's room LAST YEAR, but have yet to add a new bedcovering, window treatment, and accessories.   - We already have purchased enough polka dot fabric for a duvet or quilt top, and enough floral for pillowcases. 

We found this inspiration from Hobby Lobby

The pillowcases may even get You Go Girl's posh pillowcases treatment.


I have the plainest white cabinets.  I'd like to mess with them a little and give them some kind of character:
It would be a good idea to close the pantry door before taking a picture, huh?

Kitchen re-do, especially using that beadboard wallpaper.

 Maybe I could beadboard the cabinet doors, then mould them?  I like how they upgraded the cabinets without purchasing new cabinets:

Drab to Fab's kitchen re-do

A blog post link-up on kitchen cabinet re-do's is brewing over at Funky Junk Interiors.  I'm looking forward to perusing the results - I could find some heavy-duty inspiration there!

I want something aqua, like this:

Sweet as June Aqua re-do.

or this for Flea Market Trixie

OK, that's all for today.

Wednesday, March 16, 2011

Spring Break, day 2

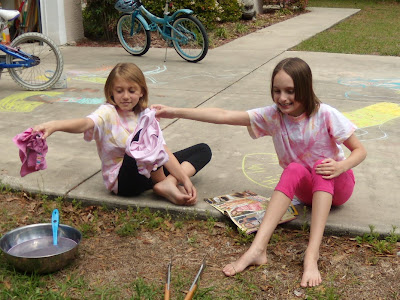
Tie-dye, biking, and playing so long in the woods that Bandaids were needed when they came home.


We dyed a pair of pink shorts, a pink tank top, and used Tulip dye in Violet (who knew I would wind up with a stash of tie-dye supplies?).  Tie them up with rubber bands,
 Dump them, stirring around occasionally (this big blue spoon was permanently discolored from last summer's tie dye fun),


Wait for about 15 minutes, or until you can't wait any more,


It helps if a new Justice for Girls catalog arrives,


Rinse a lot, remove the rubber bands, rinse some more, and Ta da!


For more on tie-dye, take a look at the tie-dye posts over at the Sm'Arties blog.  It is a lot easier doing tie-dye with 2 10-year-olds in March than doing tie-dye with almost 50 4-16-year-olds in August!

Tuesday, October 19, 2010

Going on more Picniks

Are you tired of reading about picnik yet?  

Yes, I know picnic is spelled without that "k," but our picnics are Picniks!  I love using picnik to edit pictures. 

Now Earthgirl is using Picnik, too.  She edited many of her own birthday party pictures, and had a ball.

Vignette and text


Text and border
Neon
Pencil sketch, color added back in


Ideas for using Picnik in the classroom.

Sunday, September 12, 2010

B4 and After

I found this counter-height metal chair at a local church's yard sale.  It was so sturdy and sat so well that I circled back around to it.  I could so easily envision it in a bright shiny color, so I plunked down $5 for it and hauled it out to the minivan. 

 
It's sitting in my newly-repainted laundry room, next to my newly-spray-painted rolling cart The laundry room paint is a darker khaki color than it appears in the picture.

It said "Art Department" on the back in Magic Marker.  I'd love to sit in it while creating art.  


Now look at it!  It was the favorite counter stool for Earthgirl and her friends at her birthday sleepover Friday night.

Monday, June 28, 2010

All Wrapped Up - the results

I'm happy with my wrap skirt results.  The skirt turned out a bit dressier than I envisioned.  Next I think I will do a simple A-line reversible wrap that will be the skirt equivalent to a pair of khaki capris.

 The brown side has just a little strip of contrast fabric showing

 The tan side has a whole edging of brown, partially to make it longer.  I think the tan fabric may have been 44" wide, while the brown fabric was 45" wide.  I like the way the tan fabric has 5 different blues/greens/blue-greens, since I have about half a dozen blue-green summer shirts, and maybe 3 winter ones, too.

A few things I learned along the way:


When you lay out  a half-circle wrap skirt, you are limited in length because of accommodating the larger wrap-over waist.  I'd like the skirt to be about 2 inches longer, though it is OK.  I tend to prefer really long skirts - several inches below my knees, or about an inch below the scar on my left shin.

The skirt could have been longer if I had used less overwrap at the waistline.  Since the skirt is half-circular, you have much more overlap at the bottom than the top.  Mine laps over 12" at top, which translates to 28" at the bottom. I could have cut for a 10-inch overlap and still been OK.

I had a crisis of confidence in my interpretation of the directions, so I whipped up a little skirt for Samantha as a "muslin."  It really helped me figure out what I needed to do without cutting into a big piece of fabric.  Of course, now Earthgirl wants one, too.


I must say I am happy with how it turned out.  Samantha is stylish.


I had to use really long ties to wrap the skirt either way, then tie on the side. (If you wrapped it to the back, then tied in middle front this would not be an issue.)  When I do an A-line, I think I will use 2 buttons to close the skirt.

Why a reversible?  Why a wrap?  I wanted something cool and easy for summer, easy to toss on and modest.  I did not want to need a slip, therefore, 2 layers of fabric.  And as long as I was lining the skirt, why not take it a step further and make the lining a whole 'nother skirt?

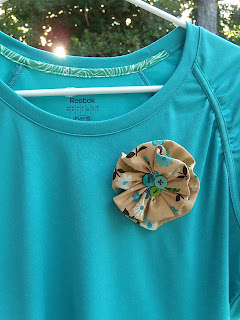
I'd like to give credit where credit is due, but don't recall where I saw this flower idea.  A fabric flower brooch is not really my style, but it is a nice cover-up for a Reebok logo.  It took a strip of scrap fabric, 3 buttons,  and about 7 minutes to whip together.  I pinned it on with a big safety pin. 

Friday, June 25, 2010

All wrapped up

I am all wrapped up in trying to figure out a reversible wrap skirt.  I'm using instructions for a half-circle wrap skirt from Sew What! Skirts book, but am making it a reversible skirt. Lots to think through...I've got it pretty well completed except for a binding at the bottom to attach the 2 skirts together.  I plan to cut bias strips of fabric 1, that will fit over both fabric 1 and fabric 2.  Maybe I won't start chopping the remainder of my fabric after 10 p.m.

Quick note on errata for the Sew What! Skirts book:  If you have or borrow this book, and the instructions for the 1/2-circle wrap say to divide the waist measurement by 6, it is wrong - you divide by 3 (approximating pi).  Later versions of the book correct this, I understand.  I found the corrections from helpful on-line sewists. 

Hey!  I just realized why many persons who sew refer to themselves as "sewists" rather than "sewers."


I also just realized that this skirt, laid out on the carpet, looks a lot like my Christmas tree skirt, only in blue/green/brown calico.

Other DIY wrap skirt patterns and tutorials:

Whatshedidtoday

The Versatile Wrap from Make it Perfect

Graceful Elements

Happy Hearts at Home

--and this seemingly (seamingly?) impossible one:

The Domesticated Skirt from Sew a Straight Line


And now just for fun, go to this 2008 post from Posy Gets Cozy and read all the way, including the comments.  You'll laugh!  Her  next newer post after this one had wrap skirts, and I found it helpful.  It tells me I need to let my skirt hang overnight before joining the 2 halves at the hemline.  Don't know if I can stand to wait.

Sunday, May 30, 2010

Sepia-Toned Ephesian Journal


This year I am reading Ephesians. 

I know, it can be read easily in one sitting.  And I have read it in one sitting. 

But I am letting it sink in deeper, memorizing some of it (maybe all by December 31, but I am not requiring that of myself.)  I am writing down sections in a special art journal. Each page may have a passage, or maybe just a few words, like the page that says, "MADE ALIVE IN CHRIST - it is by grace you have been saved -", or the page that says, "brought near."  Other pages might have whole passages, like the one that says,"Therefore, laying aside all falsehood speak truth, each one of you, with his neighbor, for we are members of one another.  Be angry, and yet do not sin, do not let the sun go down on your anger, and do not give the devil an opportunity. (4:26-28)"


Putting these words in my handwriting, sometimes in all caps, sometimes cursive, sometimes calligraphy, helps me remember them.  I'm a visual learner, and I picture where the info is on a page; especially if I have written it myself.  (I can still squint my eyes and see certain pages from my high school Biology notebook, mid 1970's.)

This is an exercise in art, too - a bit of an art journal.  I've kept it in mostly brown and golden tones.  I've vacillated between calling it tea-stained or sepia-tone.  One of my stamp pads is cordovan-color.  I really like that one.

Some of the pages are just words; others have a little picture or a stamped border. 


This little angel is my rendition of the little statuette that sits on my desk, a gift from our Sunday School class a couple of years ago, she is signing "love."

Some pages I've made tea-stained or coffee-stained.  (no cream:) 


Sometimes I pre-decorate the pages; other times I write, then decorate. Some pages are just plain words.


Some of the pages I like better than others.


So far, I have not decided what to do with the cover.  I may adhere some pretty cloth. 

It's all part of letting the Word of Christ richly dwell among me (Col. 3:16).  And you. 

Monday, May 10, 2010

Trying things on

Last week's visit to the nice home decor store (one of my SIL and Mama's favorites) held an extra bonus for me - their clearance table had remnants of some lovely fabric that cost almost nothing.  Ummm hmmm, that is yummy to me.

When I have a piece of fabric bought without a particular project in mind, I have to try it on a few places.  Do you try things on?

This brown print, uneven raw edges and all, was our tablecloth for 2 meals.


This scrap with tropical print, along with this small length of fringe, may find themselves in a pillow, maybe 10" x 22" with fringe on the ends?


And this is my favorite - a soft green/ gray-blue/ cream piece that may work well as a runner on my buffet.  When the Sm'Arties came over, there it was, selvedges hanging out shamelessly.  The flora and fauna are very Florida-looking, don't you think?


See the ferns and butterfly?


How about this shy lizard?

Can you spot the grasshopper?
Related Posts Plugin for WordPress, Blogger...